Fruit Ninja - Beginner's Tutorial
In this tutorial, I will teach you how to make a basic Fruit Ninja game in Scratch. This is a text version of a video tutorial, which is available on my YouTube channel.
Click the following link to access a blank version of the Scratch project. This project contains all of the sound and art assets, but none of the code, so you can easily follow along with this tutorial.
Let's start with the sprite labelled "FruitSprite". This will contain all of our game logic.
We need to set up a message that will start the game loop. For that, we need the "When Green Flag Clicked" block from the Events tab.

This block, and any code we attach to it, will run as soon as the game starts. However, we don't want to attach our gameplay loop directly to this, as we'll want to be able to start, or reset, the gameplay loop within the game itself, from a start or replay button. Therefore, we're going to create a new message, that will initialize the game.
Also in the Events tab, find the "broadcast message1" block. Click on the message dropdown, and create a new message. Let's call it "Play".

Attach this block to out "When Green Flag Clicked" block, and drag in a "When I Receive" block, making sure that our new "Play" message is selected from the dropdown.

We can now attach our game logic to this message receiver. Go to the Control tab. From here, first drag in a "forever" loop. This will continue to run while the game is active, and we're going to use this to generate a piece of fruit on a timer. Drag a "create clone of myself" into this loop, and then a "wait 1 second" block below that.

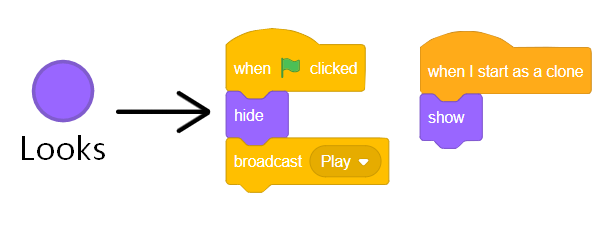
This creates a clone of the fruit sprite every second. So we should give the clones some logic. The first thing that we're going to do is to make sure that the sprite is hiding and showing correctly. Drag in a "When I Start As A Clone" block, then go to the Looks tab. From here, add a "Hide" block to the "When Green Flag is Clicked" script, and a "Show" block to the "When I Start As A Clone" script.
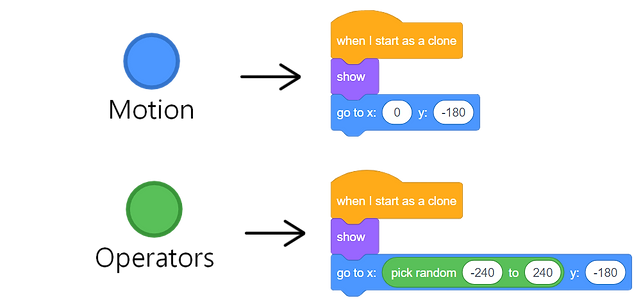
Now, let's get it appearing in the right place. Go to the movement tab, and add a "Go to X: Y:" block to our "when I start as a clone" script. We want the fruit to start at a random point along the bottom of the screen, so we can set the y value to -180, which is the lowest position on the screen. To make X random, go to the Operators tab, and drag a "pick random () to ()" block into the x co-ordinate. Into this block, set the values to be -240 to 240, which are the x co-ordinates for the left and right edges of the screen, respectively.
Next, we want to get these fruits to jump into the air. For this, we're going to need some variables. Click onto the Variables tab, and then click "Make a Variable". Make sure to select "For This Sprite Only", and call it "THIS_XVel". It's good practice to have a naming convention to separate "For This Sprite Only" variables from the global variables, so any "For This Sprite Only" variables will have names starting with "THIS_". Make another "For This Sprite Only" variable called "THIS_YVel".

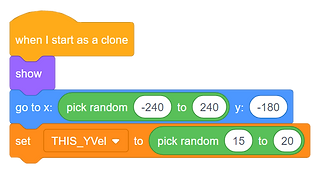
Let's sort out the Y-Movement first. Add a "Set THIS_YVel to ()" block to our "When I Start As A Clone" script. Add another "Pick Random () to ()" block into this, and set it to be 15 to 20.
We're now going to create a basic movement system. This sort of system is
super versatile, and can be adapted to fit almost any game with dynamic
movement, such as a platformer.
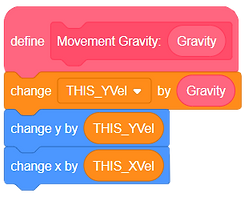
For this, we're going to make a Custom Block. Go to the "My Blocks" tab, and select "Make a Block". Into the block name, type "Movement Gravity:", add an input (with the rounded shape), and call it "Gravity". Make sure that you select "Run Without Screen Refresh" and click "OK".
"Run Without Screen Refresh" means that all of the code associated with this block will run every frame, which is generally recommended for movement systems to stop jittering.
This will automatically add a "Define" block to your project, where we can give this block some functionality. We're going to keep this super simple. Add a "Change THIS_YVel by ()" block from the variables tab to the Define block, and drag the "gravity" value from the Define block into the input slot. Go to the Movement tab, and add a "Change Y by ()" block under this. Go back to the variables, and drag "THIS_YVel()" into the input slot.


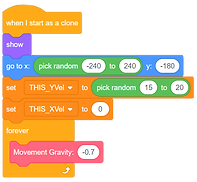
We want each clone to run this script every frame. Go back to the Control tab, and add a forever loop to our "When I Start As A Clone" script. Then, drag our movement block into this. The gravity input should be a negative number that is close to 0. The smaller (or further from 0) it is, the faster the fruit will fall - so Gravity: -3 will fall faster than Gravity: -1. I would recommend -0.7 for this game, as the player needs time to react to and click on the fruit.

Now let's sort the X-Velocity. Drag a "Set THIS_XVel to ()" block between where we set "THIS_YVel", and the forever loop. We could set this to be completely random, but ideally, fruit that start
near the edges of the screen will move faster, towards the centre, than those
which start in the centre. We can do this with some basic maths.
Head back to the operators tab, and drag an addition operator into the input for "Set THIS_XVel to ()". Drag a "Pick Random () to ()" block into each side. Set the right hand one to be -5 to 5. For the left hand one, drag a division operator into each side. Go back to the Movement tab, and add an "x position" input block into the numerator of each division. For the denominators, set the first to -30, and the second to -35.

Now go back to the define block for the Movement script, and add a "Change X by ()" block to the end. Drag "THIS_XVel" into the input slot. The fruit should now bounce across the screen in arches of varying sizes.
However, you might notice that the fruit are collecting at and sliding along the bottom of the screen. To fix this, we'll need to go back to the Control tab, and drag in another "When I Start As A Clone" block. To this, add 2 "Wait Until" blocks.

Then, go back to the Operators tab, and add a ">" block to the first "Wait Until" block, and a "<" to the second. Go to the Movement tab, and add a "Y Position" input block into the left hand side of each of these operators. Into the right hand side of the first, put "-170". Into the second, put "-175". This means that any subsequent code will only run after the fruit has bounced up past y position -170, then fallen back down to -175.

Go back to the Control tab, and end this script with the "Delete This Clone" block. The fruit should now disappear when they reach the bottom of the screen.

Now we can start making this actually playable. For this, we'll need 3 new variables. One "For This Sprite Only" called "THIS_State", which will say whether or not the player managed to slice the fruit or not, then two "For All Sprites", "Lives" and "Score". Under the "When I Receive Play" block, set "Score" to 0, set "THIS_State" to 0, and set Lives to 5.
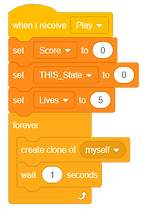
Clones inherit "For This Sprite Only" variables from the sprite that they are clones of. By setting "THIS_State" to 0 in the parent object, it will start at 0 for all of the fruit clones as well.
Go to the first "When I Start As A Clone" script. Add an if statement around everything after "show" and before the forever loop.

Go to the Operators tab, and drag an "=" operator into the condition of the if statement. Go to the variables tab, and drag a "THIS_State" input into the left hand side of this operator. It should read "if THIS_State = 0 then".

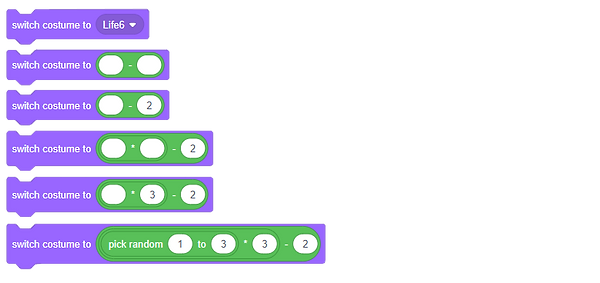
It's a bit boring for the fruit to always be an apple, so let's add some variation to the costume. Go to the Looks tab, and add a "Switch Costume To ()" block to the start of the If statement.

We want the sprite to randomly switch to costume 1, 4, or 7. We can do this with some more maths. Go to the Operators tab, and drag a "-" operator onto the input for the costume. Set the right hand side to 2. Into the left hand side, drag a "*" operator. Into the right hand side of this, type 3. Into the left, add a "pick random" function, and set it to "pick random 1 to 3." The fruit will now be randomly selected.

Now, add an "If" statement to the end of the forever loop, after the movement block.
We need this part of the code to run if three conditions are met so go to the
Operators tab, drag an "and" statement into the condition of the if statement, and
then another and into the left hand condition. Drag an equals operator into the final
condition space. Then go to the sensing tab, and drag a "Touching Mouse Pointer"
condition into the first space, and a "Mouse Down" condition into the second. Go to
Variables, and set the final condition to "THIS_State = 0".

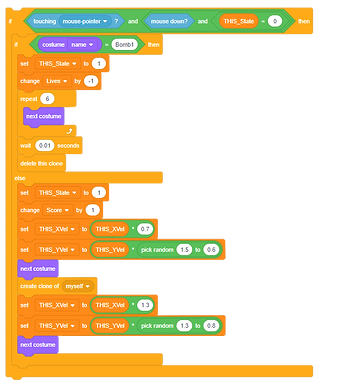
Within this if statement, we need to change some variables. First, set "THIS_State" to 1. Then, change "Score" by 1. Now, we want this single piece of fruit to split into two, giving each piece a slight change in momentum to create the impression that you've sliced it apart. Add a "Set THIS_XVel" and a "Set THIS_YVel" block into this loop.

Go to the Operators tab, and drag a "*" operator into both of these. Add a "pick random" operator into the second value in the "Set THIS_YVel" block. Set it to be "pick random 1.5 to 0.6". Then return to the Variables tab, and set the first value in the "Set THIS_XVel" to "THIS_XVel", and the second value to 0.7. This will decrease the horizontal momentum of the fruit. Drag a "THIS_YVel" input into the empty value in the "Set THIS_YVel" block

We want to create another clone to represent the other half of the fruit, so go to the Looks tab, and drag in a next costume block, then go to the Control tab and add a "Create Clone Of Myself" block. Then repeat the code from the "Set THIS_XVel to ()" block to the "Next Costume" block, changing the values in the "Set THIS_XVel to ()" block to read "Set THIS_XVel to THIS_XVel * 1.3" and the values in the "Set THIS_YVel to ()" block to read "Set THIS_YVel to THIS_YVel * pick random 1.3 to 0.8".

The completed "If" statement should now look like this:

Now, find the script where the clones get deleted, and add an "If " statement after the second "Wait Until" function and before the "Delete This Clone" block. Set the condition to "THIS_State = 0". In this statement, change Lives by -1. This will cause the player to lose a life if, and only if, they missed a piece of fruit.

Let's add a new mechanic - bombs. These the player will want to avoid
clicking, or else they'll lose a life. First, we need there to be a chance
for a bomb to spawn instead of a piece of fruit.
Go to where we set the initial costume for the fruit, and place this
block into the "Else" part of an "If... Else..." block.
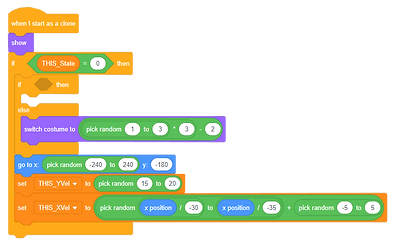
Set the condition to read "If Pick Random 1 to 5 = 5, then within the statement, switch costume to Bomb1.

We also need to add a check when the player misses a fruit, to ensure that the clone that they missed was not a bomb. In the script which deducts a life, drag the "THIS_State = 0" condition into the first condition of an "and" operator.
Drag a "Not" operator into the other condition space, and then an equals operator into that. Then return to the Looks tab and drag a "costume name" input into one side of this. Into the other, type "Bomb1".

Now, go to where our script detects whether a clone is touching the mouse, and drag everything within this If Statement into the "Else" part of an "If... Else..." statement. The condition of the "If" portion of the statement should state "If Costume Name = Bomb1".
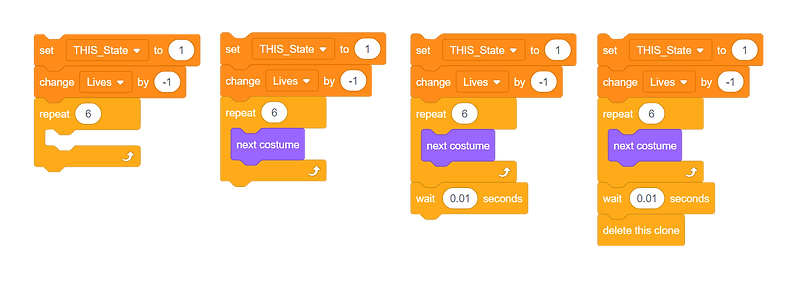
Within this, the first thing we need to do is change some variables. First, set THIS_State to 1. Then, change Lives by -1.

We also want the bomb to pass through 6 frames of animation. To do this, go to the Control tab, and drag in a repeat loop. We want it to repeat 6 times.
Then go back to the Looks tab, and add a "Next Costume" block to this loop. This will cause the costume to change once per frame for 6 frames. After this, we want a very short delay, before the clone deletes. Go to the Control tab, add in a "Wait 0.01 Seconds" block, and then a "Delete This Clone" block.
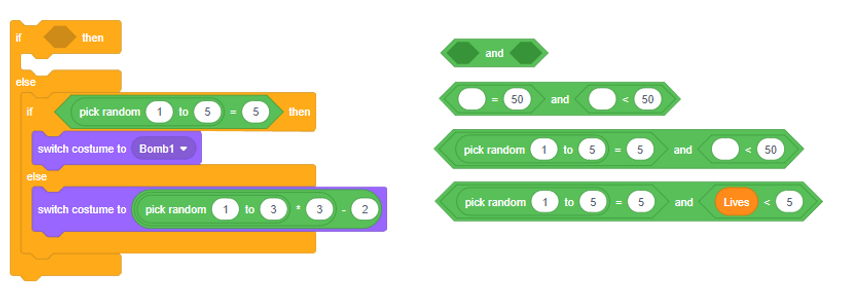
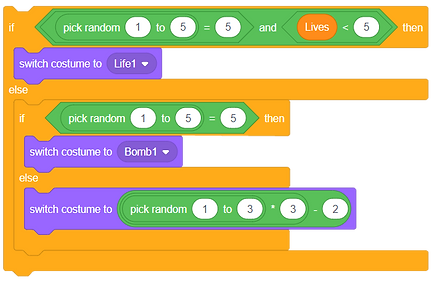
The bomb will now deduct a life and explode when clicked. Now, let's add in a New Life object. Go to where the costume is selected, and drag the entire "If...Else..." statement into the else portion of another "If..Else..." statement. Drag an "and" operator into the If condition. Add an "=" operator into the first condition space, and a "<" operator into the second. Set the first condition to read "If Pick Random 1 to 5 = 5", and the second to read "Lives < 5".
And into this function, "Switch Costume To Life 1".
We don't want the player to lose a life for missing this, so go to the code that checks whether the player missed a piece of fruit. Take the "Costume Name = Bomb1" condition, and add it to the first condition space of an
"Or" function. Set the other condition to be "Costume Name = Life1".

Now, let's go back to the code that detects whether the clone is touching the mouse. Drag the "If Costume Name = Bomb1... Else..." statement into the else portion of another "If... Else... function. Set the condition to read "If Costume Name = Life1".
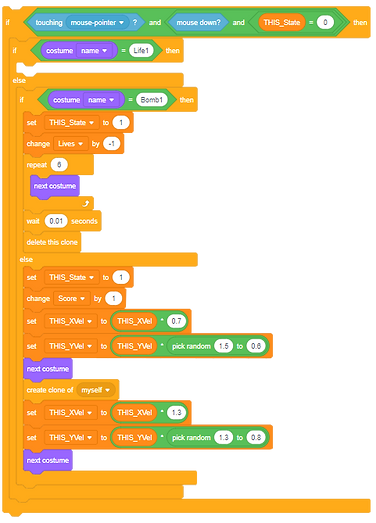
Before continuing to read this tutorial, I encourage you to try and fill this function in independently, as it's very similar to coding that we've already covered. We want this to add 1 life, and play 5 frames of animation, before deleting the clone. Give it a go, and then read on, to see if you did it like I did!
So this section of code should be very similar to that of the bomb. We should first set THIS_State to 1, then change Lives by 1. We then need a repeat loop that repeats 5 times, and this loop should contain the "Next Costume" block. Then "Wait 0.01 Seconds", and "Delete This Clone". Did you manage to do it? Do you understand any mistakes that you made?

Now we should add in a fail-state, so that the player can actually lose the game. Go to the Events tab, and drag in another "When I Receive Play" block. Go to the Looks tab and add a "Switch Backdrop To ()" block, and select "Gameplay". Then, go back to the Control tab, and add a Forever loop. Within this loop, add an if statement.

The condition should read "If Lives < 1 then", and within this loop, we first want to send out a New Message. Like we did for the "Play" message earlier, drag in a "Broadcast" block from the Events tab. Then, from the dropdown, select "New Message" and call it "End".
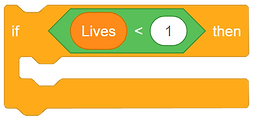

Then, go back to the Looks tab, and add another "Switch Backdrop To" block, this time switching to "EndScreen". And then we need to stop all of the forever loops, so go to the Control tab, and add an "Stop Other Scripts In This Sprite" block, and a "Stop This Script" block.

This will cause the game to display a Game Over message and - for now - completely stop. We can give this page some more functionality later, but first, I want to add in the start screen. First, find our "When Green Flag Clicked" script, and remove the "Broadcast Play" block. Add a "Switch Backdrop To PlayScreen" block.

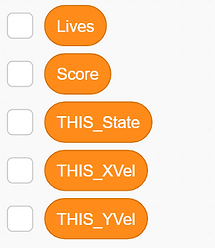
If you haven't done so yet, now would be a good time to hop on over to the Variables tab, and uncheck all of these boxes. This will hide the Variables, and will stop them getting in the way.
Now, we can add in a play button. Click over to the PlayButton Sprite.

First, drag in a "When Green Flag Clicked" block, and then add a "Show" block from the Looks tab. Then go to the Motion tab, and add a "Go to X: () Y: ()" block after this. Set the value for X to "0", and for Y to "-66".
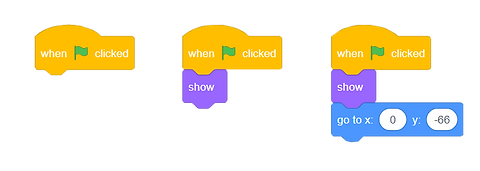
Then add in a "Forever" loop, and into this, an "If...Else..." function. The condition for this should be the "Touching Mouse Pointer" block, which can be found in the Sensing tab.

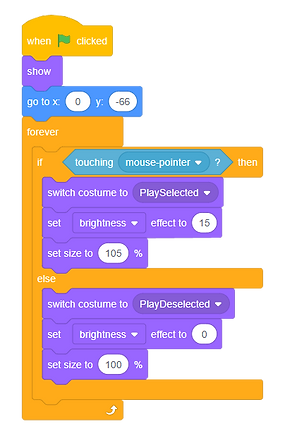
We can use this to create a nice mouseover effect for the play button, which is important for player satisfaction. Go to the Looks tab, and add a "Switch Costume To PlaySelected" block into the "If" portion of the "If...Else" Function. Then
add a "Set Brightness Effect To: ()" block, setting the value to be 15, and then "Set Size To () %", using the value 105.

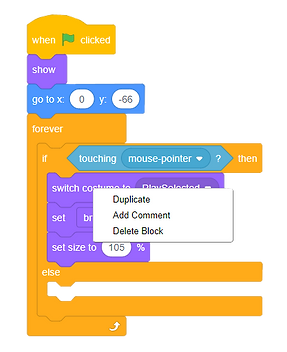
Now, right click the "Switch Costume To PlaySelected" block, and click duplicate. Drag the three new blocks into the else function. Set the new "Set Brightness Effect To: ()" to 0, and the new "Set Size To () %" block to 100.
The complete script should look like this:
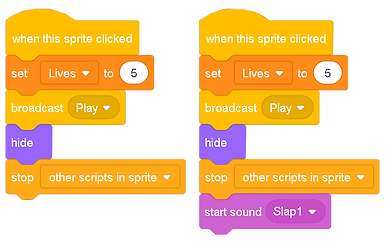
Now, add in a "When This Sprite Clicked" block from the Events tab. To that, add in a "Set Lives To 5" block from the Variables tab, a "Broadcast Play" block from the Events tab, a "Hide" block from the Looks tab, and a "Stop Other Scripts In This Sprite" block from the Control tab.
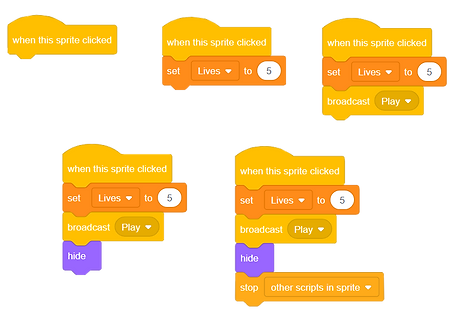
We now have a functioning play button. However, it's a bit jarring how suddenly the game starts. To fix this, go back to the FruitSprite, and find the code that spawns in the clones. Add in a "Wait 1 Seconds" block before the forever loop. You can also remove the "Set Lives to 5" block from this, as the Play Button now does that automatically.

Now we can really easily add in a Replay button to the Game Over screen. Go back to the PlayButton sprite and add a "When I Receive End" block from the Events tab. Now go to the "When Green Flag Clicked" script and duplicate everything from "Show". Attach these blocks to the new "When I Receive End" script. We need to change some of the values, so for the "Go To" block, change the Y value to -90, set the "Switch Costume" block in the If portion of the If...Else... statement to "ResetSelected", and the "Switch Costume" block in the Else function to "ResetDeselected". The complete script should look like this:

Next, let's set up some UI to display the lives, and the score. Click over to the UI sprite.

Start off by adding a "When Green Flag Clicked" script, and to this, adding a "Hide" block from the Looks tab.
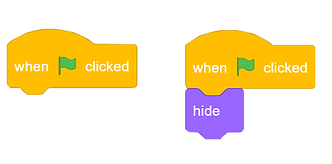
Now, we want to create a custom block, so go to the My Blocks tab. Click "Make a Block" and type "Delete" into the block name section. Click OK. Add a "Delete This Clone" block to the new "Define" script.

This allows us to use the Delete This Clone function in the middle of a script, when usually it could only be placed at the end. Through this, in a single script, we can delete any clones, without them running the code, while the parent object, which cannot be deleted, simply runs the code in full.
Add in a "When I Receive Play" block from the events tab, and to this, add our new "Delete" block. Then add a "Go To X:() Y:()" block, setting the values to X: -217, and Y: 155.

Now, we need a new variable. Set it to "For This Sprite Only", and call it THIS_Value. Add a "Set This_Value to 1" block to our "Play" script.

This variable will allow us to give each UI clone unique behaviours. Speaking of which, let's create a script to generate the clones.
For this, we'll need another Custom Block. Call it "Clones", and make sure that "Run Without Screen Refresh" is selected.
To the definition, add a repeat loop, repeating 5 times. Within this loop, add a "Create Clone Of Myself" block, and a "Change THIS_Value by 1" block. This will create 5 clones of the UI sprite, with each one having a unique "THIS_Value", that we can use to refer to each of these clones.


Add this new block to our "When I Receive Play" script. In full, it should look like this:

Now let's give these clones some functionality. Add in a "When I Start As Clone" block. To this, add a "Show" block, and an "If...Else..." block. Drag an "=" operator into the condition space, and then a "THIS_Value" input into one side of this. The condition should read "If THIS_Value = 1".

In the "If" portion of this statement, add a "Switch Costume To LifeIcon" block from the Looks tab. This will cause the first clone to display a heart icon, indicating that the following UI is a lives counter. Then add another "If...Else..." function into the "Else" portion of the statement. The condition of this should be "If THIS_Value = 2".

In the "If" portion of the new statement, add a "Set X To ()" block from the Movement tab. We want this set to -184. Then, add a "Forever" loop, and in this, add a "Switch Costume To" block from the Looks tab. Into this, add a "Lives" variable input. This will make the second clone display how many lives the player has left.

The rest of the clones need to display the score, which we'll code in the "Else" portion of the "If... Else..." function. We'll also need a "Set X To ()" block here, but we're going to need some maths to set the X position of each clone. Drag a "+" operator into the input space. Then drag a "*" operator into the first of the input spaces. Into the first of these input spaces, add a "THIS_Value" input, then write 27 into the second, and 85 into the third. The block should read "Set X To THIS_Value * 27 + 85".
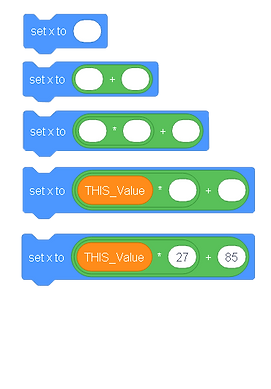
Now add a forever loop. This will handle our costume changes. Add an "If...Else..." statement into this loop. Because we're only using 3 clones to display the score, we can't accurately display any numbers over 999, so we want to add in a check for this. Add a ">" operator into the condition space. We want this to read "If Score > 999".

Into the "If" portion of this, "Switch Costume To 9". This means that for any value that's too big to display, the score will default to 999. Into the "Else" portion of the statement, add another "If...Else..." statement.
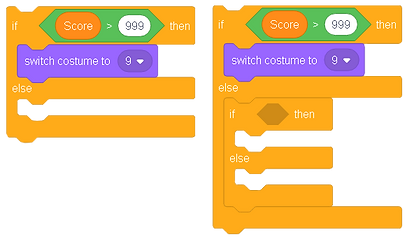
Here, we want to check whether the Score variable is large enough to need the relevant clone to display it - for example, if the player's score is 15, then only 2 clones are needed to display the value.
Drag a "<" operator into the condition. We're going to need some maths to get the appropriate value for this. Drag a "-" operator into the first input space, then another "-" operator into the first input of that, and another into the second input space of that. Drag a "THIS_Value" operator into the first input space. Into the second, type "3". For the third, we need the "Length Of ()" operator, with the "Score" variable as the input for that. And set the last input space to 2. This gives the position of the appropriate value for the clone to display. We want to set this to be < 1, as this would indicate that the Score value is too short for the clone to be needed.
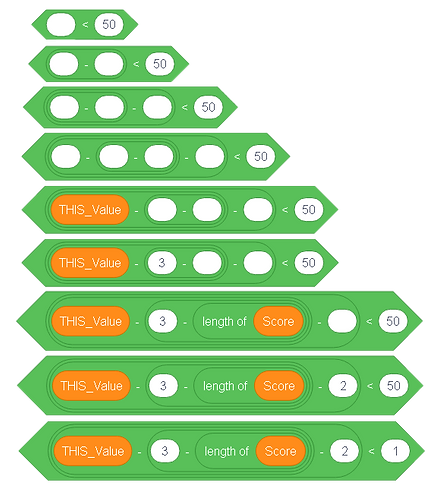
Into the "If" portion of this statement, add a "Switch Costume To 0" block. This means that a score of 5 would be displayed as 005, and a score of 25 would be displayed as 025. Into the Else portion, add another "Switch Costume To" block, and into the input, add a "Letter () of ()" operator. For the first of these inputs, copy the "THIS_Value - (3 - Length Of Score) - 2" value from the "If...Else..." condition. The second input should be "Score".

This is what the full script should look like:

And now we want to handle the UI for the game over screen. We want it to delete the Lives counter, and display your score in the centre of the screen.
To do this, drag in a "When I Receive End" block from the Events tab. To this, add an "If...Else..." block from the Control tab. Add an "<" operator, with a "THIS_Value" variable as the first input. We need this to read "If THIS_Value < 3".

Add a "Delete This Clone" block to the "If" portion of the statement. Add a "Go To X:() Y:()" block to the "Else" function. The Y Value we can set to 26.

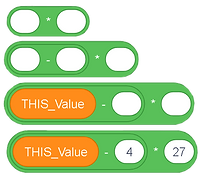
We'll need some basic maths to correctly set the X position. Drag a "*" operator into the X input space, and then a "-" operator into the first input space of that. Add a "THIS_Value" variable into the first input space, type 4 into the second, and 27 into the third. This will use the clone's value to shift the clone along the appropriate amount.

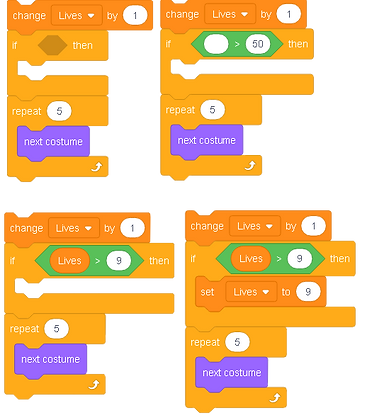
Now let's add in a few quality of life improvements. The first is that our lives counter can only display a single digit number, so we want to add a check to make sure that the number of lives never exceeds this. This is already unlikely, as the extra lives only spawn if your lives drop below 5, we can add an extra check when the lives are added. Return to the FruitSprite, and find where the lives are added, when an extra life is clicked.
Add an "If" function between "Change Lives By 1" block, and the repeat loop. Add a ">" operator to the condition space, and add a "Lives" variable input into the first input space. Into the second, add nine. Within the function, "Set Lives To 9". This will cap our lives to be a single digit.
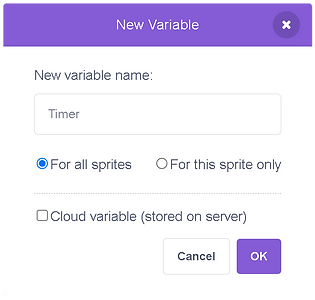
Next, we want to have the game speed up the longer that the game runs, to ramp up the challenge for the player. First, create a new variable, for all sprites, called "Timer".
Now, add in another "When I Receive Play" block to our FruitSprite. Then, "Set Timer To 1". After this, add in a "Forever" loop, and within this loop, "Wait 5 Seconds", and then "Change Timer By 0.2".

To have this actually speed up the gameplay, find the "Forever" loop that creates the fruit clones. Drag a "/" operator into the "Wait" block within this forever loop, and add the "Timer" variable input into the second input space.
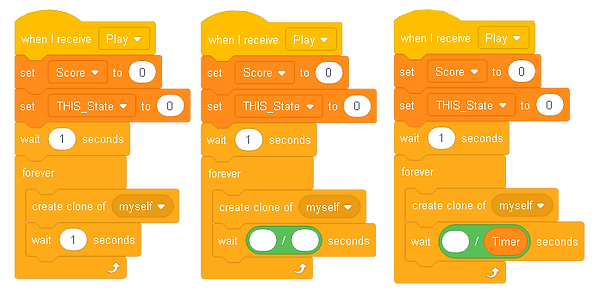
To add a bit of random variation to the spawning, add a "Pick Random () to ()" block into the first input space. Set the values to be 1 to 3.

You might notice that the fruit sometimes collides with the edges of the screen in a rather jarring way. This is a result of a feature of Scratch that prevents sprites from going off the screen, so that younger users cannot inadvertently lose their sprites and not know how to get them back. We need a work-around for this.
Find the "Define" block for our custom "Movement" block. Add an "If" statement to this, with a ">" operator as the condition. Drag an "Abs of ()" block into the first input space.

The "Abs" or Absolute Value of a number represents the size of a number, regardless of whether it's positive or negative. For example, both 5 and -5 have the absolute value of 5. Drag an "X Position" input from the Movement tab into the input space of the abs block. We need the full condition to read "If abs of X Position > 240".
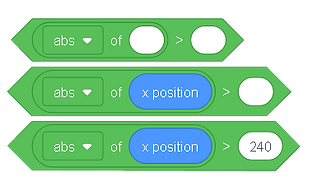
Within the "If" statement, add a "Hide" block. This will cause the fruit to disappear when they go off the side of the screen.

I also want to add a mouse trail effect whenever the mouse button is held down. Go to the "MouseTrail" sprite.

I also want to add a mouse trail effect whenever the mouse button is held down. Go to the "MouseTrail" sprite.
First, we want to add a "When Green Flag Clicked" block, and to that, attach a "Hide" block This ensures that the mouse trail sprite is not initially visible.
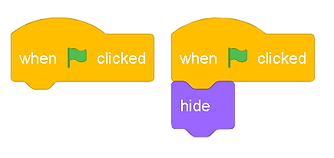
We then need a "When I receive Play" block. To this, add a "Forever" loop. Within this loop, add a "Go to Random Position" block from the movement tab, and from the drop down of this block, select "Mouse- Pointer". This will cause the mouse trail to actually follow the mouse.

Now add a "When I Start As a Clone" block. Then go to the Looks tab, and add a "Show" block, a "Go To Back Layer" block, and a "Set Size To 100%" block.

Then add a "Repeat 5 Times" loop. Within this loop, add a "Change Size By -20%" block from the looks tab. After the loop ends, "Delete This Clone".

This is everything for this sprite, so go back to the "FruitSprite". Find the script with the forever loop that ends the game if the player loses too many lives.
Add another "If" statement into the forever loop, setting the condition to be "Mouse Down". Add a "Create Clone of Myself" block into the loop, and from the drop-down, select the "MouseTrail" sprite. This will create a trail that follows the mouse whenever the mouse button is held.
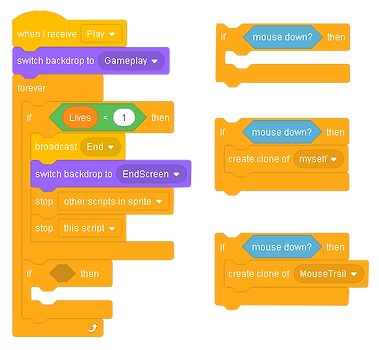
Another small bug that you may have noticed is that some of the fruit stays on the screen after the game ends. This is a really easy fix!
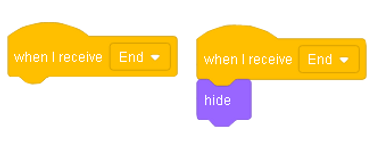
Still on the FruitSprite, add a "When I Receive End" block, and to that, a "Delete This Clone". That's enough to resolve this issue.
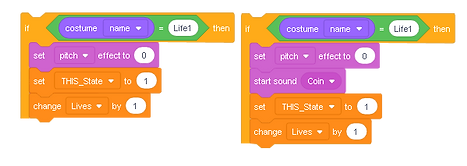
Now let's move on to sound! Sounds add a lot of impact and juiciness to your game, and shouldn't be overlooked as part of the Gamedev process. Let's start with all of the sounds for the FruitSprite. Go to the script where the clones respond to touching the pressed mouse. In the "If Costume Name = Life1" function, add a "Set Pitch Effect To 0" block, and a "Start Sound Coin" block from the Sounds tab.
Then, in the "If Costume Name = Bomb1" function, add another "Set Pitch Effect To 0" block, and then "Start Sound Crunch".

The sound for cutting the fruit will be slightly different. As this is a sound that will be played a lot of times in quick succession, it would get very annoying very quickly. To circumvent this, we'll do something called "pitch-shifting", which means that the pitch that the sound is played at will be slightly different every time. Start by adding a "Set Pitch Effect To ():" block into the "else" portion of the "If Costume Name = Bomb1... Else..." statement. Add a "Pick Random () To ()" operator into the input space, with the values set to -15 to 15.

To add some further variety, we'll also randomise the sound that it played. Add a "Start Sound ()" block after the "Set Pitch Effect" block. Drag another "Pick Random () To ()" operator into the input space, with the values set to 1 to 3.

We also want to have a sound when the player misses a fruit, to indicate to the player that they've made a mistake. Find the "If" statement that detects whether the player missed a fruit. To this, add a "Set Pitch Effect to 0" block, and a "Start Sound Crunch" block.
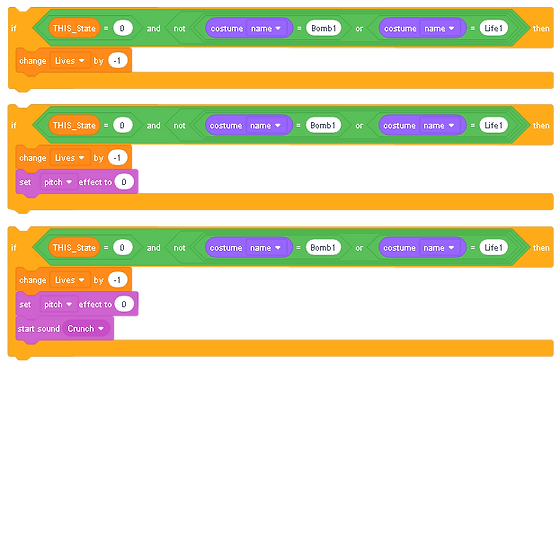
That's it for the FruitSprite. Now go to the PlayButton sprite. Simply add a "Start Sound Slap1" block to the "When This Sprite Clicked" script.
Mechanically, that's our project complete! One final bit of preparation before we publish our project - the thumbnail.
The way that thumbnails work in scratch is that whatever is on the screen when you save and close the project for the final time is saved as the thumbnail, a mechanic that we can use to our advantage to display a custom thumbnail. Go to the thumbnail sprite.


The only code we need in here is a "When Green Flag Clicked" block, with a "Hide" block. Make sure that the sprite is at position (0, 0), and click the "Show" and "Go To Front Layer" blocks in the Looks tab. This will ensure that the thumbnail takes up the entire screen, but will hide when the player actually starts the game.


Now, hit that orange "Share" button, and you are done! Congratulations! Thank you for following along with this tutorial, I really hope that you've learned something.


